
How to make a cable kit for paper lanterns.

|
|
How to make a cable kit for paper lanterns. |
|
 PLEASE NOTE.These instructions use sharp tools and require electrical connections and should not be done by anyone who is too young or otherwise unable to undertake the tasks required safely. While none of the required operations are more involved than connecting a plug it is important to do things carefully and correctly to avoid injury. If in doubt ask for some help from someone who is handy.The plug should be the last item to be connected as detailed below. Do not plug the assembly in until:
How to make a paper lantern power cord kit.The following instructrions are based on having 12 paper lanterns per power cord kit. You can adapt materials required for varing quantities of lights.Step 1 - What you needA) Tape measure.B) 12 x Pendant light fittings. One per lantern. C) Knife. we suggest using a small fixed blade knife. D) 48 x Cable ties. These can be smaller than the ones shown which are about 150mm (6"). We suggest using cable ties that will match the wire and cord colour being used or use transparent ties. E) Wire strippers. These are optional but make it easier to strip the insulation off the wires. There are a number of different designs of wire strippers, the ones shown are readily available from most hardware shops. F) 25M (75ft) of lighting cord. See the table below for information on the size of wire to use. We suggest using the flat electric cord as the round cord is much bigger and you will not get two of these through the light fitting. G) A suitable screwdriver for tightening the screws in the pendants. About 3mm (1/8 "). H) Small side cutters. Many pliars include a cutter that can be used instead. I) A suspension cord. Note We do not suggest the wire cored washing lines as it is difficult to cut and tie. J) A suitable 2 or 3 pin power plug. K) 12 x Light bulbs. Low energy 15 - 20 W bulbs are GREENER. If you are only using the lighting for a specific event 40 - 60 W tunston lights will be cheaper. L) 12 x Paper lanterns. If you have a colour theme you can either use a standard colour or use white paper lanterns and paint them to the exact colour you would like. You can even decorate the lanterns.  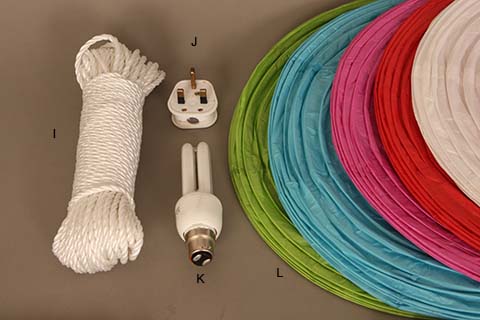
Subdued or bright lighting?The strength and number of lights will affect how bright your lighting is, as does the colour of the paper lanterns used (with white being brighter than coloured paper lanterns). For parties and weddings often more subdued lighting is required and lower wattage bulbs are adequate. As the light output is higher per watt for the low energy lights you should compare the equivalent light output when selecting the required bulb wattage. To provide more flexibility we suggest making a few assemblies with fewer lights than one with all your lights. By doing this you can simply unplug a few if the lighting assemblies to make the lighting more subdued.Step 2 - Cut the electric cords.Use the side cutters or a pair of suitable pliars to cut the electic cord as follows.For 12 lanterns you will need 11 (one less than the number of lights) inter connecting cables. We suggest the interconnecting cables are about 1.6 M (5ft 3") long. You will need the distance you require between each lantern plus about 600mm (2 ft) for the two vertical sections. So for lanterns about 1 meter a part cut the cords 1.6 M (5ft 3") long. You will need one extra piece of cord to go from the plug to the first lantern. In general about 3 to 4 meters (9 to 12ft) should be about right, to give enough length to reach from the first lantern to a plug socket or extension. Step 3 - Strip all the cable cord ends.Using the knife, carefully cut the outside sheath of the electric cord about 38mm (1.5") from the end, being careful not to cut the inside wire insulation. Tip: Bend the electic cord where you want to cut the outside sheath and carefully cut the sheath on the outside of the bend. This will make it easier to see the the wire insulation as you cut through the sheath. After cutting around the sheath pull the sheath off.  Using the wire strippers or a knife remove about 6mm (1/4") of the sheath from the wires as shown in the following images. With the type of wire stripper shown simply use correct cutter section for the size of wire being used, ensure the wire is in the center of the cutter, squeeze and pull off the wire's sheave.  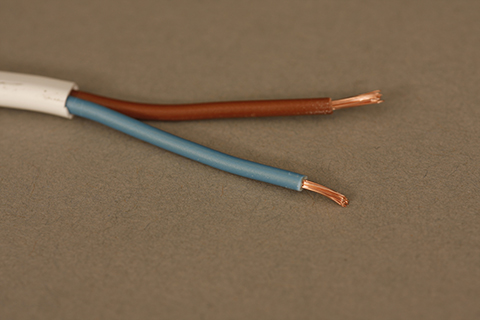 Step 4 - Connecting the first pendant fitting.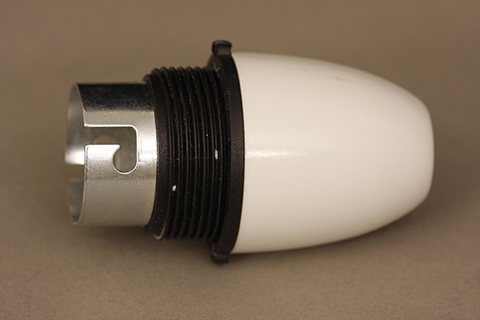 Unscrew the top cap from the fitting as shown in the next image. 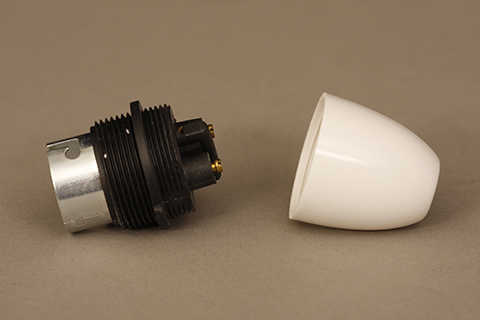
Take the one end of the long cord (that you will use to connect the plug to) and one end of one of the connecting cords and fit through the hole in the cap. Note On some caps you may find that getting two cords through the hole is a bit tight and you may need to enlarge the hole slightly. This can normally be done with a few twists of a suitable knife or you could use a suitable drill. 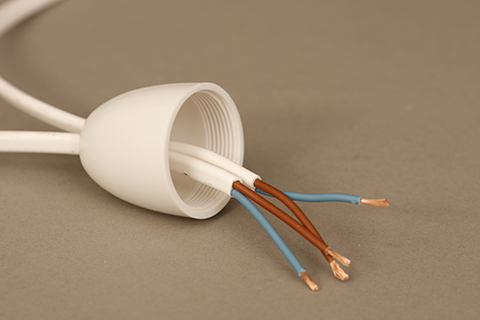
Twist the two brown (or the similar coloured wires) wires together as shown in the following image. Note You can optionally solder the wires but this is not required. 
Loosen one of the screws on the light fitting so that the wires will easily fit in and push the two twisted wires in. Ensure that all the wires go in and that there are no wires sticking out. Tighten the screw securely. Finally tug on the wires to ensure that they are both held securely. Twist the other two wires and attach as shown below. 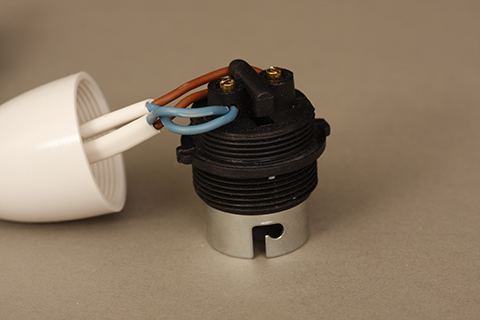
Now take the wires an push under the hooks as shown in the following image. 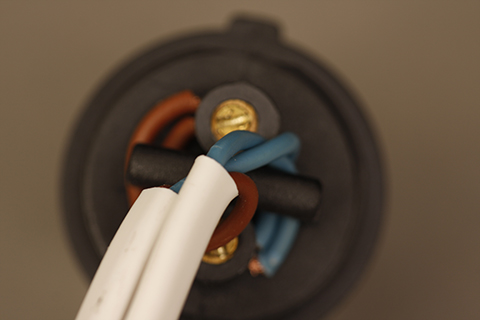
Take a cable tie and wrap around the two wires as shown in the following image. You need to position the cable tie so that it will stop the wires from being pulled out after the cap is replaced. Clip off the excess of the cable tie, as shown in the two images below. 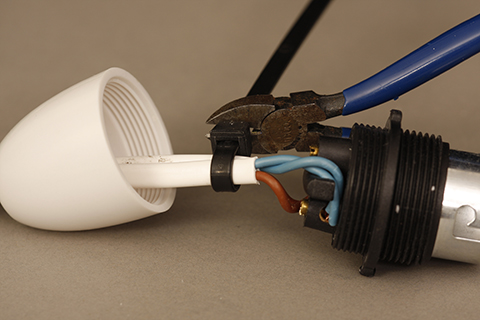

Screw the cap back onto the fitting as shown in the next image. 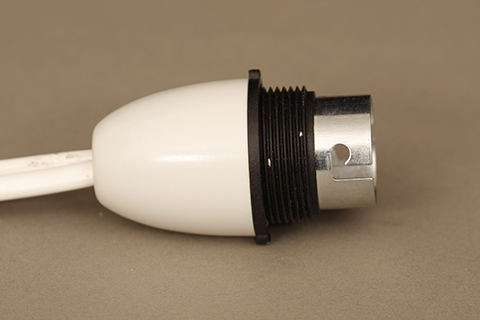
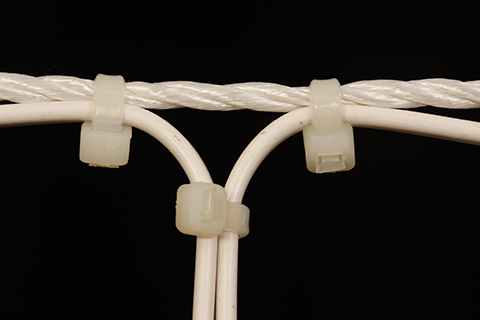
Step 5 - Connect the other light fittings.Join the free end of the inter-connecting cord from step 4 and another inter-connecting cord to a new light fitting following the general instructions above. On the last light fitting there will only one wire to connect.Step 6 - Connect the plug.Connect the plug to the end of the long cord.Step 7 - Creating the vertical dropper.Where two wires come out of the light fitting lay them flat and use a cable tie to fix them together about 280 mm (11") from the top of the light fitting as shown below. We have used a cable tie that matches with the cord colour.
Trim off the excess length of the cable tie. Step 8 - Attach to a suspension rope.While the light fittings and paper lanterns are very light you may wish to tension the lights across a room / space. For this reason we suggest that you attach the electrical cord to a separate rope that can be tensioned as required. Plastic washing line is cheap and readily available at most supermarkets or hardware stores. We will call this a 'rope' in the following instructions.We suggest that you make the rope long enough so that you have extra length to tie to a suitable support at each end. Lay the rope on a table and lay the electrical cord next to it. Use some cable ties or string to attach the electical cord to the rope at suitable intervals. We suggest that you do not tighten the cable ties too tight so that the two can move independently which will prevent tension being put on the electical wires. See the following two images showing how to connect the two together. Again trim off any excess length on the cable ties. 
Step 9 - Assemble the paper lanterns.Follow the instructions to assemble the paper lanterns and attach to the lighting cord as shown.
Step 10 - Tension the rope.Tension the rope where required plug in and admire your work.There are various ways you can hang the lights depending on your requirements. You could use multiple units to form a cross, aisle, arches etc. Video - How to decorate a paper lantern. Watch an example of the how to decorate a paper lantern on YouTube 
|
||||||||||||||||||||||||||||||||||||||||
| Meeting your requirements |
|
While we hope that the information we have provided above has been of help to you, we appreciate that everyone's requirements are different and invite you to contact us about your specific needs. |
![]()
or call on 01494 721739 for more information.

|
|